Learning the process of bonding
Yasmin Jayathirtha
Here is the hard part of chemistry; the need to use evidence from the macroscopic world to infer the happenings in the atomic one. Part of the problem is that atomic structure and bonding is taught fairly briskly, giving the models developed as facts rather than exploring the processes by which these models developed. Then these models are used to justify the properties of compounds. This leaves the students, particularly if they have not quite got the argument, with a feeling that they just have to know a lot of facts. What are the experiments that students can do to illustrate these ideas and put them into a context? This will then let them use the ideas for unknown examples. The outline for the activities will illustrate these statements.
Before teaching atomic structure and bonding, it would be helpful to have done experiments on the properties of materials.
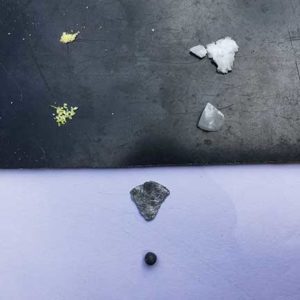
Take salt, sand, sugar, wax/plastic, sulfur/iodine, and lead shot/tin. These solids exemplify the various bonding types – ionic, giant covalent, simple molecular polar, macromolecular, simple molecular, and metallic lattices. They are also, mostly, familiar to the students from everyday life.
To introduce the activity, I use a worksheet like this:
Materials
There are a lot of materials in the world. I am sure, just looking around you will be able to pick at least a hundred unique substances and you don’t even have to be in the lab. How many do you think have been studied?
With so many, how can we even begin to study them? We can see if they can be grouped according to how they behave. Of course, if they are mixed together, they may behave differently.
There are six substances here. They have been chosen to represent a group to which they belong. What can we find out about them that will let us see how they are different from each other?
What do the words ‘physical properties’ mean to you?
What are some physical properties?
The physical properties that can be studied are –
Volatility
Take a small amount of the material in a hard glass test tube or on a spatula/spoon. Heat on a Bunsen flame and note whether the substance melts or vapourises and how quickly. Label them as volatile/non-volatile.
Notes: sulfur and iodine should be heated in a test tube. Lead shot will melt and can be dropped on to the table.
Hardness
Take a small amount of the material, place it between sheets of paper and hammer. Classify the materials as hard and brittle, soft, or malleable. These categories will be arrived at after discussion, does it take force to break it, can it be scratched?

Density
Measure the mass of a 10 cm3 measuring cylinder. Fill it to the mark with the substance, pack it well and reweigh. Calculate the mass of 1 cm3. This will come out of a discussion of the ‘lightness’ and ‘heaviness’ of the different substances. At this point, we can ask the old riddle “which is heavier, a ton of feathers or a ton of lead?” and talk about the mass of a specified volume.
Solubility in water
Do they all dissolve in water? Take a pinch of the substance, add about 5 cm3 of water and shake. Does it dissolve? We should also ask whether they need to try it out for all substances, which ones are they sure will/will not dissolve?
As a link to the previous activity, as you added water, did the material sink or float? Was it denser than water? Does the solution conduct?
Conductivity
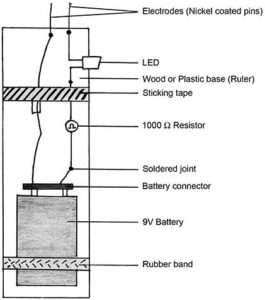
Make the conductivity meter as described here. Small plastic rulers can be used as the base and once all joints have been soldered and the pins set fairly close to each other, insulation tape can be used to hold the arrangement in place. One conductivity meter can be shared between 2-4 students. This works better than multimeters. The multimeters only beep with metals and graphite but the conductivity meter will light up for solutions too. So we can test the conductivity of solids, then that of solutions.

Solubility in hexane
Take a pinch of the substance, add about 5 cm3 of hexane and shake. Does it dissolve? Did it dissolve in water too?
All these activities can be done by the class, in one of two ways. One, students can be divided into groups, they pick one of the substances and carry out all the tests and document it in a common table of data. This lets us discuss how to label – yes/no or ticks to show the range. Each property may lend itself to a different way. In the other, students can come to the front of the class and demonstrate, say solubility, and the class as a whole will decide what to enter in the tables.
When this project was carried out, we started with a few properties, then started adding conductivity, and solubility in hexane etc; after some discussion. It did irritate one neatnik, who had her table beautifully drawn up and found herself needing to add more columns!
In the next phase we can ask the students to pick out a solid from the shelves, do the tests and assign it to a group. One student picked graphite and said, ‘except for the fact it conducts, it is most like sand’. We can also give properties and ask which group it could be assigned to. Notice that we are not using any theory, only the data they have generated. This will be helpful when they learn bonding. They will already know the properties and will have to correlate them to the bonding model.
The author works with Centre for Learning, Bengaluru. She can be reached at yasmin.cfl@gmail.com.


